
Setting up Tap to Pay is a one-time job for the account owner, and it takes about ten minutes. You turn it on, save a reader address, switch on in-person payments in Stripe, and order a reader. After that, technicians connect readers themselves from the mobile app.
Before you start
- You're the account owner. Settings → Integrations is owner-only.
- Stripe is connected and can take charges. The Tap to Pay card only appears in Settings → Integrations once a Stripe account is linked, and the Stripe card must show Connected and Charges enabled. Until Stripe can take charges, the Tap to Pay switch is greyed out with Finish Stripe payment setup (KYC) before turning this on. See Enabling online payments with Stripe.
- Your techs use the Run a Call mobile app from the App Store or Google Play. The reader only works in the installed app, not in a web browser.
Turn on Accept in-person cards
Go to Settings → Integrations and scroll to Tap to Pay. Turn on Accept in-person cards.
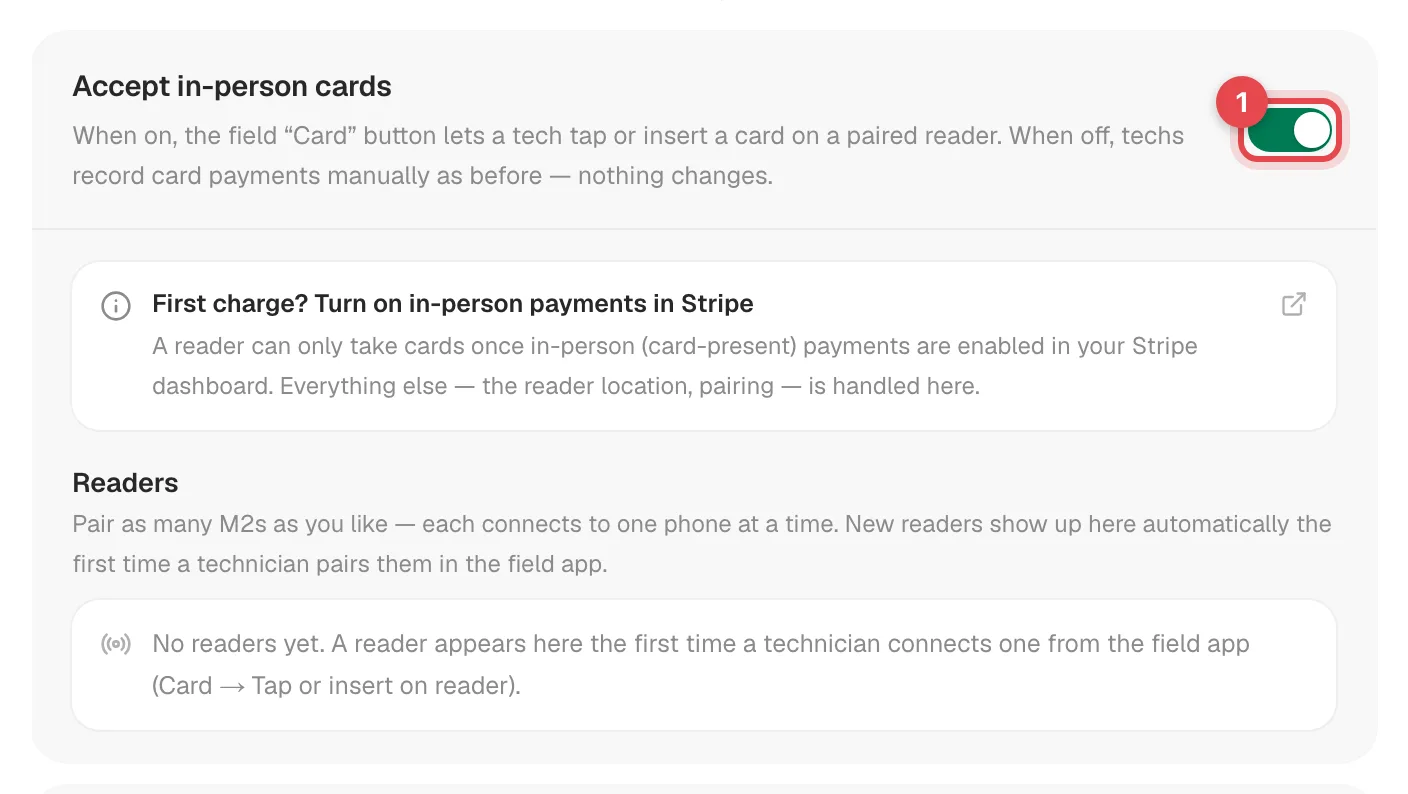
With the switch on, the Card button in the field app sends the payment to the reader. Turn it off and techs record card payments by hand again. Nothing else changes.
Save your reader location
The first time you turn it on, a One-time setup: reader location form appears. Stripe needs a business address for your readers. Your shop address is fine, because readers move with the truck.
Fill in Street address, City, State and ZIP, then click Save location. You only do this once.
Turn on in-person payments in Stripe
A reader can only take cards once in-person (card-present) payments are enabled in your Stripe account. Run a Call can't switch this on for you. Click First charge? Turn on in-person payments in Stripe in the Tap to Pay card to open the right page in your Stripe Dashboard, and enable it there. This is also a one-time step.
Order your readers
Click Order a reader — about $59 in the How Tap to Pay works section. It takes you to Stripe's hardware shop for your account (Terminal → Shop). Tap to Pay works with the Stripe Reader M2.

If the tips in that section mention Card → Tap or insert on reader, picking a reader from a list, or Record manually, go by this guide instead: techs just tap Card and the app connects to the nearby reader on its own. See Taking a payment with Tap to Pay.
How many to order: each reader connects to one phone at a time, so buy one per technician who collects payment. That's usually one per truck.
When the reader arrives
In the box you'll find the reader and a charging cable. Charge it fully before first use (about two hours), and keep it charged in the truck.
To power it on, press and hold the side button for a second or two. You'll hear two beeps, then green lights sweep back and forth while the reader waits for a Bluetooth connection.
Hand it to a tech
That's all the office setup. The first time a tech collects a card payment, the app finds the reader, connects to it and registers it for you. Walk your techs through Taking a payment with Tap to Pay.
Managing your readers
Every reader your team connects shows up under Readers on the Tap to Pay card.
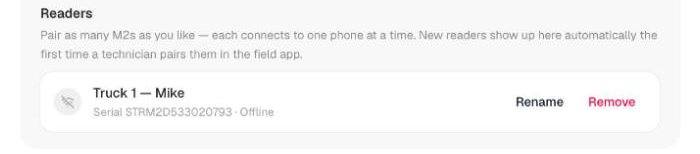
- Rename a reader so you know which truck it's in, for example Truck 3 — Mike.
- Remove a reader you've retired. If you need it again, it re-registers the next time a tech connects it.
- Offline only means the reader isn't in use right now, which is normal whenever it's powered off or idle.
Turning Tap to Pay off
Turn off Accept in-person cards and confirm Turn off. Techs go back to recording card payments by hand, and your saved readers stay on the list.