Saved text templates are the texts your office sends again and again, written once and shared with the whole team. They sit in the same Templates list as the built-in texts, one click from the message box in any customer conversation.
Before you start
- Business texting has to be live. See Sending and receiving SMS.
- Anyone who can text customers can create and edit templates. Deleting one needs full access to conversations (owners and admins by default).
- Templates are for one conversation at a time. There's no bulk or group texting to customers.
Where templates live
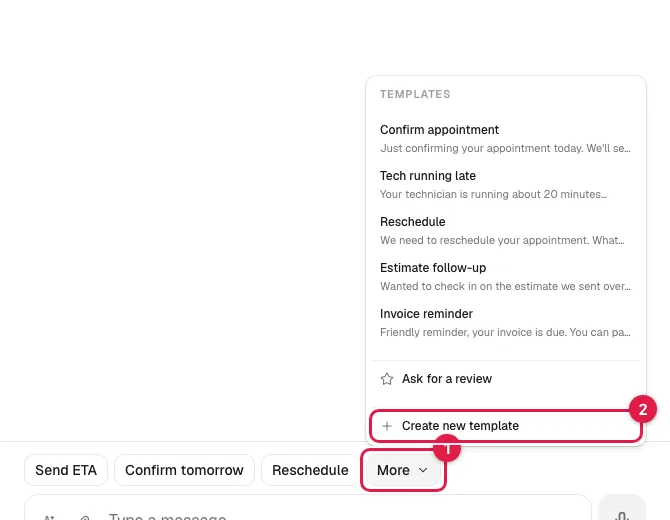
Open any customer conversation in Conversations → Messages (or the Communication tab on a customer's profile) and click More next to the message box. The list is headed Templates:
- The five built-in texts: Confirm appointment, Tech running late, Reschedule, Estimate follow-up, Invoice reminder.
- After a thin line, your shop's own templates, in name order. Each row shows the name and the first line of the message.
- Ask for a review, which sends your review link straight away (not a template).
- Create new template.
Create a template
- Click More, then Create new template.
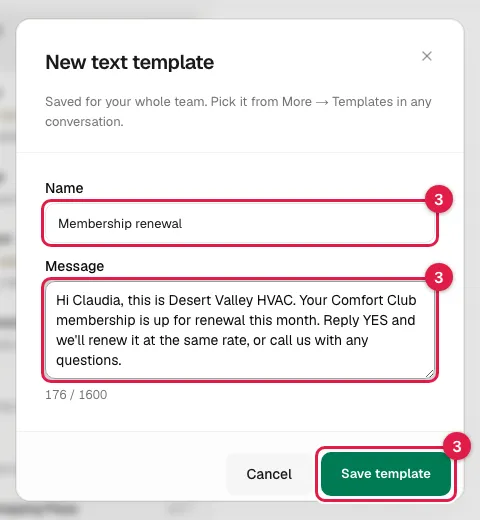
- In the New text template window, type a Name: this is what you'll see in the list, up to 60 characters. Something like Filter reminder or Directions to the shop.
- Type the Message, up to 1,600 characters. The counter under the box shows how much you've used.
- Click Save template.
The window says it: Saved for your whole team. Pick it from More → Templates in any conversation. Everyone in the office sees the new template right away.
Use a template
Click More, then click the template. Its text lands in the message box. Nothing sends until you press Enter or click send, so you can change a name, a date or a price first. Your business name is added to the front of the text when it goes out, as with every text.
Edit a template
- Click More and hover the template's row. A pencil appears on the right (Edit template).
- Click it. The Edit template window opens with the current name and message.
- Make your changes and click Save template.
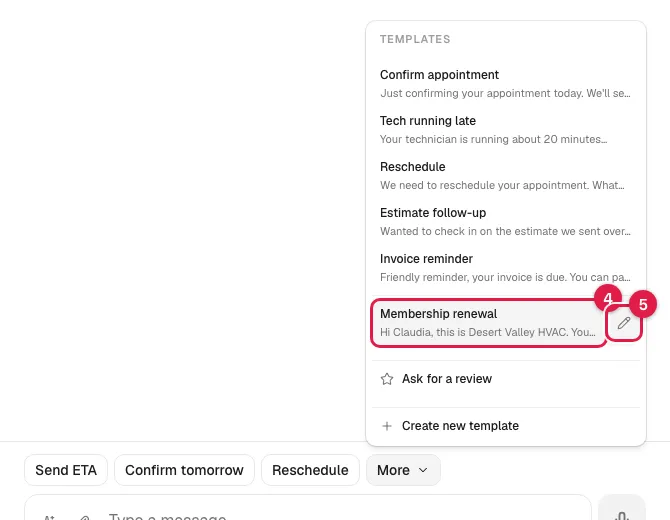
The change applies for everyone from then on. Texts already sent don't change.
Delete a template
Owners and admins (anyone with full access to conversations) see Delete at the bottom of the Edit template window.
- Open the template for editing and click Delete.
- Confirm Delete this template? with Delete template.
The template is removed for everyone on your team. Messages already sent are not affected.
Good to know
- Shared, not personal. A template saved by one dispatcher shows up for every teammate who can text. There are no private templates.
- Plain text. Templates hold words only. To send a photo or a document, add it with the paperclip after you pick the template. See Sending photos and files by text.
- Emojis are removed when a text goes out, so leave them out of the template.
- Invoice and estimate links have their own shortcut buttons above the message box (Send invoice link, Send estimate link). A template can't pull in a link on its own.
- Automatic texts (confirmations, reminders, on-my-way) are not templates. Turn those on and change their wording in Automations. See Changing the wording of a built-in message.