
A vendor credit is money a supplier gives back on a purchase order: a part that arrived damaged, a return, a warranty claim, a pricing correction. In Run a Call every vendor credit belongs to the purchase order the part was ordered on, so you can always match the credit to the order and to the job.
Who can use vendor credits: anyone in the office who can edit purchase orders. Changing or voiding a credit that is already Received takes full access to Pricebook & Inventory.
Add a vendor credit
A credit can be added to a purchase order that is Ordered, Received or Billed and has a vendor.
-
Go to Expenses → Purchase Orders and open the purchase order.
-
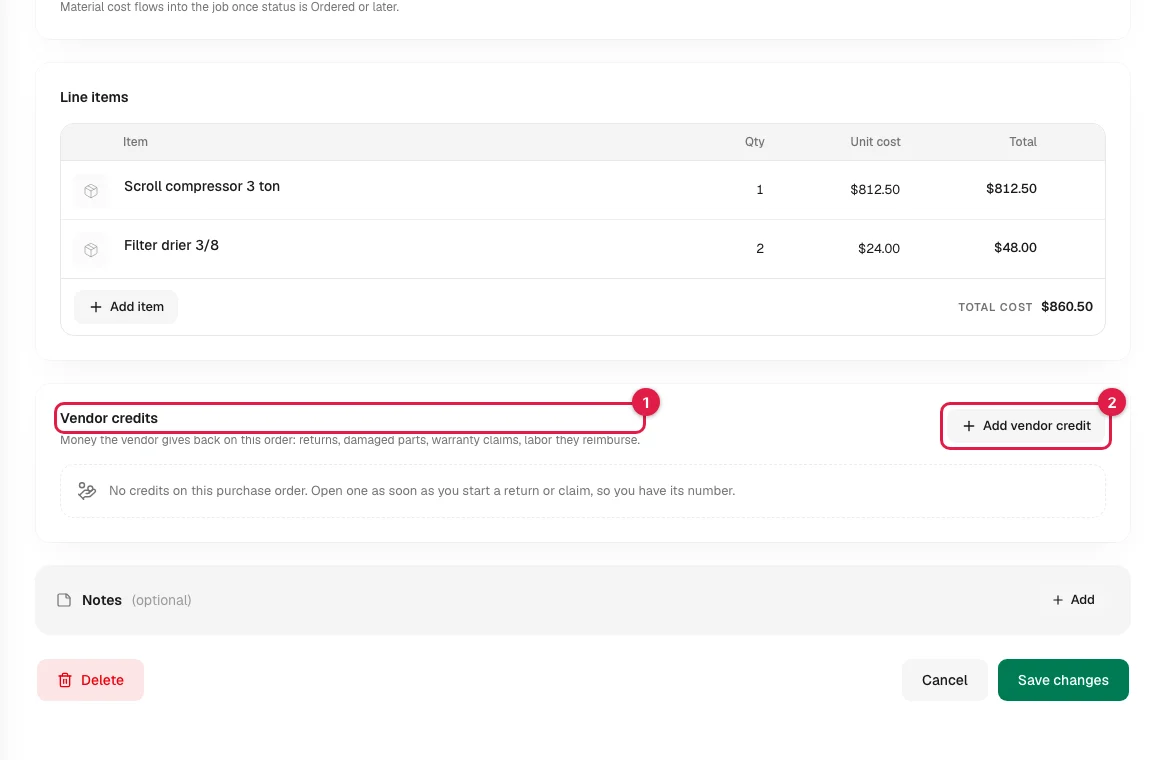
Scroll to Vendor credits, under the line items, and click Add vendor credit.
-
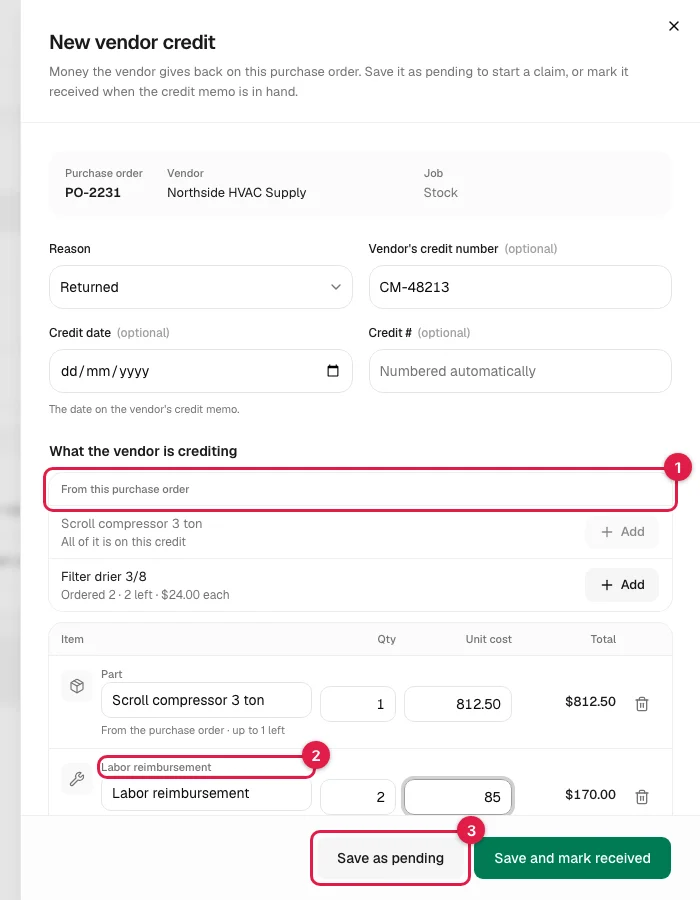
Choose a Reason: Arrived damaged, Returned, Warranty claim, Pricing correction or Other.
-
If the vendor gave you a credit memo, RMA or claim number, type it in Vendor's credit number. Credit date is the date on the vendor's memo; leave it empty until you have one.
-
Under What the vendor is crediting, add the lines:
- From this purchase order lists the order's own lines. Click Add next to a line to credit it. The quantity can't go over what was ordered, counting any other credits already on the order.
- Add labor reimbursement adds a line for labor the vendor is paying you back, such as a warranty labor allowance. Enter the hours and the hourly rate, or 1 and a flat amount.
- Add fee adds a line for a restocking or freight fee. Enter it as a minus, like -15.00, so it reduces the credit.
-
Click Save as pending if you are still waiting on the vendor, or Save and mark received if the credit memo is already in hand.
Start a warranty claim before you know the amount
You don't need the amount to open a credit. Click Save as pending with no lines at all and the credit gets its number straight away, so you have something to quote to the vendor.
When the vendor's credit memo arrives:
- Open the credit from the purchase order or from Expenses → Vendor Credits.
- Add the lines and the Vendor's credit number.
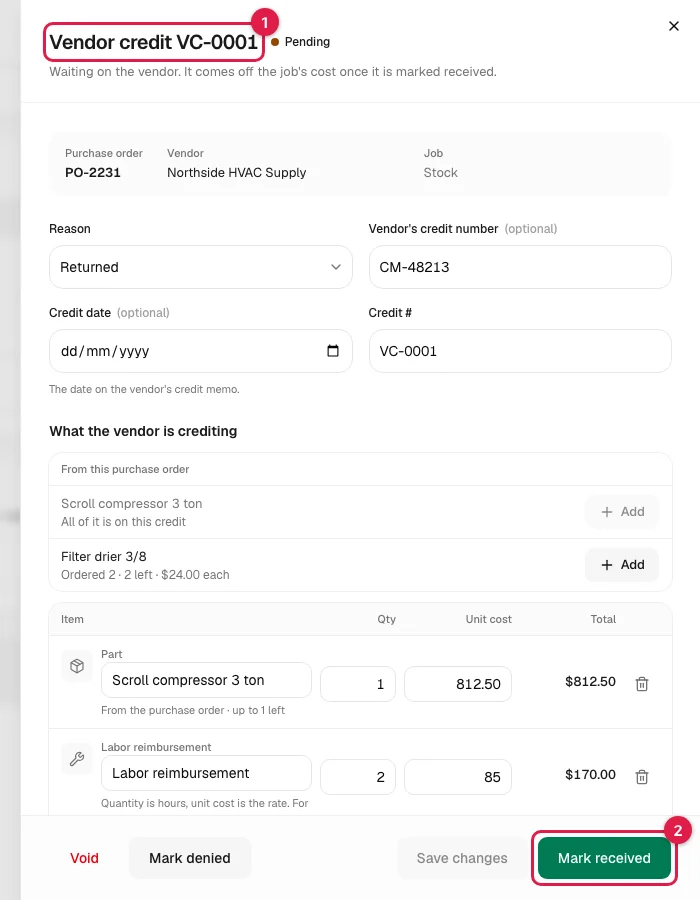
- Click Mark received.
Credit numbers
Credits are numbered automatically: VC-0001, VC-0002 and so on. You can type your own number in Credit #. If you type one that continues an older numbering, for example VC41300, the next automatic number carries on from it (VC-41301).
Statuses
| Status | Meaning | Comes off the job's cost? |
|---|---|---|
| Pending | The claim is open and you are waiting on the vendor. | No |
| Received | The vendor's credit is in hand. | Yes |
| Denied | The vendor refused the claim. Click Reopen if that changes. | No |
| Void | Entered by mistake. A void credit can't be changed or brought back. | No |
On a pending credit, Mark denied records a refusal and Void removes the credit from every total. Voiding a received credit puts its amount back on the job's cost.
What a received credit changes
- The job's cost. The whole credit, labor reimbursement included, comes off the job's material cost. In the job's costing you'll see a Less vendor credits line under the purchase orders.
- The job's purchase order card. The order shows the credit next to its cost.
- The Expenses report and the dashboard spend card. Received credits come off total spend and off that vendor's total. See Expenses report.
See all your vendor credits
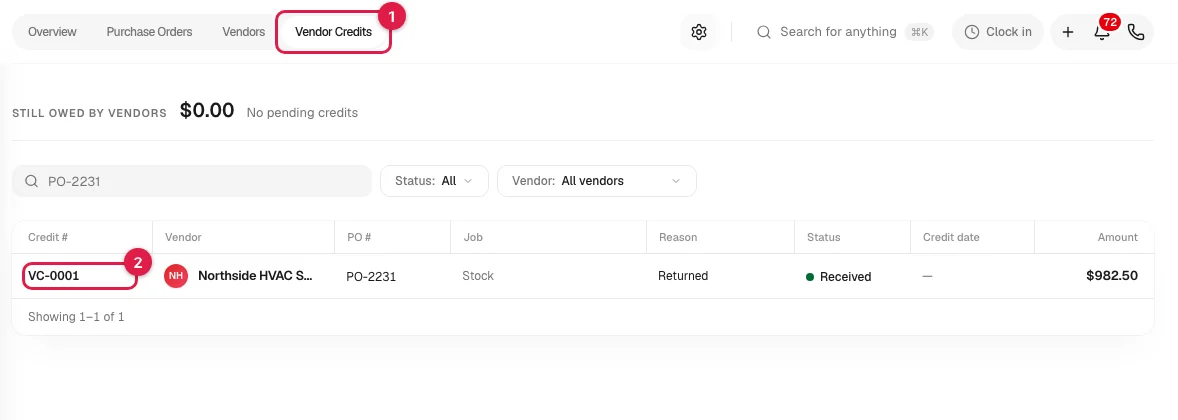
Click Expenses in the sidebar, then the Vendor Credits tab. Filter by Status or Vendor, or search by credit number, PO number, the vendor's own number or notes. Still owed by vendors at the top adds up your pending credits.
What you can't do while a credit is on a purchase order
While a purchase order has a pending or received credit, you can't cancel or delete the order, move it back to Draft, change its vendor or change its line items. Void the credit first.
Send vendor credits to QuickBooks
This is off until you turn it on.
- Go to Settings → QuickBooks. On QuickBooks Online, open Sync settings & account mapping.
- Turn on Vendor credits and click Save settings.
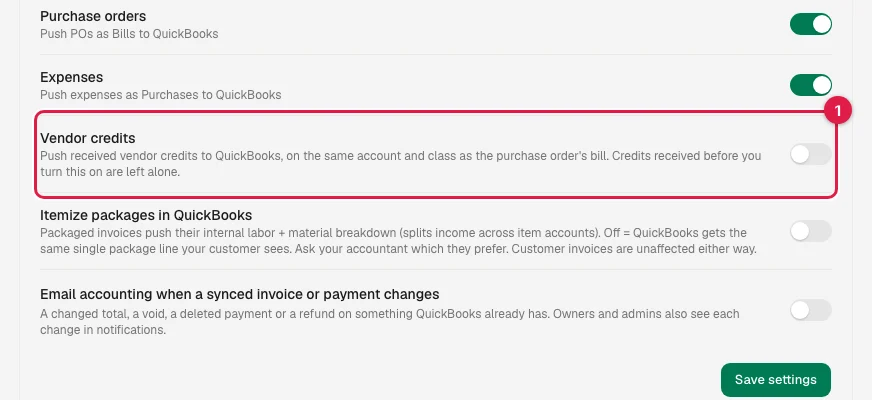
Once it is on:
- Each credit you mark Received goes to QuickBooks as a vendor credit, on the same vendor, account and class as the purchase order's bill. It needs the same COGS Account (Purchase Orders) that purchase orders use.
- The number on it is the Vendor's credit number, or the credit's own number when there isn't one. The memo carries the PO number.
- The credit is not applied to a bill for you. It shows as available credit when your bookkeeper pays that vendor's bills.
- Pending and Denied credits are never sent.
Credits you marked received before turning the switch on are left alone. If you were entering vendor credits in QuickBooks by hand, they won't be sent a second time.
QuickBooks Online: if you change a received credit, the vendor credit in QuickBooks is updated. If you void it, the vendor credit is removed from QuickBooks. If your bookkeeper had already applied it to a bill, that bill's balance goes back up and Run a Call tells you so.
QuickBooks Desktop: credits go over on the next Web Connector run. QuickBooks Desktop can't be told about a change to a credit it already has, so if you edit a received credit, make the same change in QuickBooks Desktop. Voiding a credit removes it from QuickBooks Desktop on the next run. A credit with a fee line arrives as one line for the net amount.
If a credit can't be sent, it appears on the QuickBooks page under the records that need attention, with a Retry. See Resolving common QuickBooks errors.